This is the second part of my review on Relief Beyond Belief. The first part was the ebook itself; this section covers the dies and burnishing papers. I didn’t bother photographing the die kits; if you go to Dan's website you will see comprehensive pics there. Each comes in its own storage box, with its own glass tile. You get nine sizes in each box with the corresponding centers. It is laminated so the clay wipes off easily to prevent transfer. I bought three styles, a rectangle, the “stamen” sort of oval and a “pod” shape. It is almost a must to get the ebook and the dies; you need the instruction to use the dies. You need the dies to implement the instruction.
Dan recommends using scrap clay while you are learning; wisely I took his advice. Perhaps it’s just me but there seems to be a steep learning curve with this product. It could be the number of steps (more than ten) that threw me for a loop. I don’t cook anything with more than 8 ingredients in it; and I am pretty much the same with my clay. I realize the need for the steps; I understand the process; the results are worth it. Do I want to spend the time? …..meh.
The process is just that, a lengthy process that until I used the dies didn’t seem that long. As I have mentioned in previous posts-I have the attention span of a flea. So for me I really tried to go through each step; and it is necessary in order to get the smooth look that Dan achieves.
One thing that is immediately apparent to the student is the veneers that are used absolutely “make” the bead. While varied in shape (over 18 different die shapes) they are pretty basic in that it makes a shape that is easily embellished with knock-out veneers. As I mentioned in the previous review Dan does not cover veneers; only the dies.
I really don’t want to give a step by step description of the process but after making the veneer, burnishing it and cutting it out-then it is finally ready to lay on the die and begin the work of smoothing with your fingers. This part takes a lot of practice.
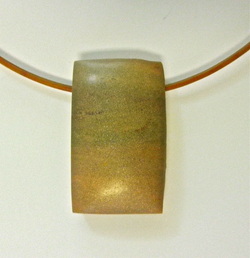
You are in effect stretching out the “skin” of the veneer to create the curve and it takes a lot of practice to make it even. I made several beads and still haven’t got the hang of it. Sometimes my finger would stick so I used cornstarch to make it glide better. But you have to be sure to wash it thoroughly before the next step so the raw clay sticks as it should. You can also see in this shot how essential it is to sand, and sand and sand! The bottom must be absolutely flat in order for there to be no gaps! As I said I was cutting corners a couple times and it does show in the results.
I briefly mentioned the burnishing papers. I did order a pack with the dies. Before they arrived I tried doing the same thing with parchment paper and the results were not as good. Unfortunately the burnishing pack is ten dollars and I do think with a bit of searching you could find a sturdy rag paper that would work as well.
In conclusion, I think that to learn this technique it would take a lot of patience plus a lot of practice. It isn’t cheap, so if you are on a budget you might want to wait a bit. Dan and Terry are great people (they immediately got back to me with answers to all my questions) and I certainly don’t begrudge them making money. BUT if you can at all do it-take the class from Dan and Terry personally instead of sending for the book and dies. It could be like a mini-vacation. You will have fun (they seem like a hoot) and you can decide without an investment.
** Editors note: There are slight changes in this blog as it was transferred from my original site; nothing has changed about the process though or the final review.
Dan recommends using scrap clay while you are learning; wisely I took his advice. Perhaps it’s just me but there seems to be a steep learning curve with this product. It could be the number of steps (more than ten) that threw me for a loop. I don’t cook anything with more than 8 ingredients in it; and I am pretty much the same with my clay. I realize the need for the steps; I understand the process; the results are worth it. Do I want to spend the time? …..meh.
The process is just that, a lengthy process that until I used the dies didn’t seem that long. As I have mentioned in previous posts-I have the attention span of a flea. So for me I really tried to go through each step; and it is necessary in order to get the smooth look that Dan achieves.
One thing that is immediately apparent to the student is the veneers that are used absolutely “make” the bead. While varied in shape (over 18 different die shapes) they are pretty basic in that it makes a shape that is easily embellished with knock-out veneers. As I mentioned in the previous review Dan does not cover veneers; only the dies.
I really don’t want to give a step by step description of the process but after making the veneer, burnishing it and cutting it out-then it is finally ready to lay on the die and begin the work of smoothing with your fingers. This part takes a lot of practice.
You are in effect stretching out the “skin” of the veneer to create the curve and it takes a lot of practice to make it even. I made several beads and still haven’t got the hang of it. Sometimes my finger would stick so I used cornstarch to make it glide better. But you have to be sure to wash it thoroughly before the next step so the raw clay sticks as it should. You can also see in this shot how essential it is to sand, and sand and sand! The bottom must be absolutely flat in order for there to be no gaps! As I said I was cutting corners a couple times and it does show in the results.
I briefly mentioned the burnishing papers. I did order a pack with the dies. Before they arrived I tried doing the same thing with parchment paper and the results were not as good. Unfortunately the burnishing pack is ten dollars and I do think with a bit of searching you could find a sturdy rag paper that would work as well.
In conclusion, I think that to learn this technique it would take a lot of patience plus a lot of practice. It isn’t cheap, so if you are on a budget you might want to wait a bit. Dan and Terry are great people (they immediately got back to me with answers to all my questions) and I certainly don’t begrudge them making money. BUT if you can at all do it-take the class from Dan and Terry personally instead of sending for the book and dies. It could be like a mini-vacation. You will have fun (they seem like a hoot) and you can decide without an investment.
** Editors note: There are slight changes in this blog as it was transferred from my original site; nothing has changed about the process though or the final review.
 RSS Feed
